Setting up Storyline with branded fonts
Continuing from last week “Setting up Storyline with branded colours”, this week we’re going to show you how to set up themed fonts in Storyline to make your elearning compliant with your client’s corporate identity.
Using theme fonts
Theme fonts in Storyline will determine the default font appearance of text and header boxes. When you choose an object or text in Storyline and click on the font dropdown in the Home tab on the ribbon, the first two options under Theme Fonts will be the two fonts you determined in the Design tab.

To change to a different built-in font theme or create a new, client branded theme, go to the Design tab and click Fonts.

You can choose to edit one of the Custom themes or create a new theme by clicking at the bottom of the dropdown.

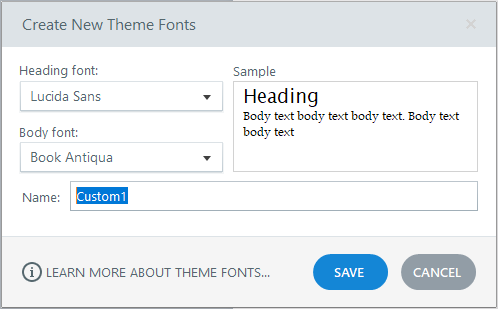
Clicking on the dropdowns under the Heading font and Body font will allow you to choose different fonts for each, and the Sample panel will show you an preview of what that font combination will look like in your elearning.
Once you’ve selected two compatible fonts or entered the approved branded fonts, enter a name for the theme and select Save. You can always edit any of the custom themes by right clicking on one of the options and selecting Edit.
Talk to us today about how to create elearning that reinforces your brand while your learners learn! Contact one of our graphic designers today by emailing info@pathwaysinc.ca.


Comments